
.jpg)


![Do More With Less: How To Build An AI Search Strategy With Limited Resources [Webinar] via @sejournal, @hethr_campbell](https://www.searchenginejournal.com/wp-content/uploads/2025/04/featured-1-73.png)


![The 11 Best Landing Page Builder Software Tools [2025]](https://www.growthmarketingpro.com/wp-content/uploads/2024/04/best-landing-page-software-hero-image-1024x618.png?#)


![What Is Generative Engine Optimization [Tips & Workflows To Do It]](https://moz.com/images/blog/banners/What-Is-Generative-Engine-Optimization-Tips-Workflows-To-Do-It-1.png?auto=compress,format&fit=crop&dm=1745607929&s=6f75f1f02c531af0f80acb12517c8bab#)


![Social media image sizes for all networks [May 2025]](https://blog.hootsuite.com/wp-content/uploads/2023/01/Social-Media-Image-Sizes-2023.png)


How to Schedule Facebook Posts in 3 Easy Ways (+ Save Hours Every Week)
Stay consistent and grow your audience on Facebook with these simple, time-saving scheduling tips.


I run a Facebook group called Freelancers Who Work Smart, Not Hard, but, for ages, I managed it the hard way, not the smart way.
The hard way looks like this: trying to remember to post regularly (when I sometimes can’t even remember what day of the week it is), coming up with some of my best ideas at 3 a.m. (before promptly falling asleep and forgetting them), and posting sporadically with neither consistency nor strategy. Days or even weeks (eek) would go by without me posting, and the group would lose momentum.
Somewhat ironically, things changed when I went on maternity leave. Before taking three months off work, I scheduled two posts a week to keep the group active while I was dealing with diapers. In doing this, the group ended up becoming more active than it’s ever been!
So in the interest of working smarter, not harder — whether you run a Facebook Page or Facebook Group — let me walk you through how you might be able to set up a similar process.
In this guide, I’ll cover the main advantages of scheduling Facebook posts and explain exactly how to schedule posts on Facebook to improve your posting consistency and content performance.
Jump to a section:
- 5 benefits of scheduling Facebook posts
- How to schedule a post on Facebook using Buffer
- How to schedule a post on Facebook on the app
- How to schedule a post on Facebook using Meta Business Suite
- How to edit or delete a scheduled Facebook post
- 5 quick tips for scheduling Facebook posts
- More Facebook resources
5 benefits of scheduling Facebook posts
Whether you’re trying to increase brand awareness, grow your audience, build community, or generate leads (or all four!), there are many benefits to scheduling your Facebook posts in advance.
1. Maintain consistency
Where content is king, consistent content is the trusted advisor the king can’t live without. It’s simple: When you post regularly, your audience knows what to expect and when to expect it. And you stay top of mind so they don’t forget who you are and what you do.
The numbers back this up. Buffer’s data scientist, Julian Winterhiemer, analyzed engagement across all platforms Buffer supports — Instagram, Facebook, TikTok, LinkedIn, Bluesky, Threads, X, YouTube, Mastodon, and Pinterest. And, guess what? The most consistent posters received 5 times more engagement per post than users who posted inconsistently.
From my own small and less impressive dataset, I can definitively say that scheduling = consistency. Check out my stats below. I was on maternity leave (with scheduled posts) from May 1st to July 31st. There’s clearly a lot more activity happening in the former half of the chart compared to when I relied on my ad-hoc posting (after August 1st).

So scientifically and anecdotally, scheduling posts consistently is your secret weapon for building an engaged, loyal audience.
2. Create higher-quality content
The beauty of scheduling your posts is that it gives you the gift of time.
Instead of scrambling to come up with something on the fly, you can plan ahead and make sure each post is thoughtfully crafted and not just checking the box of, “Oh heck, I need to post something before people think I’ve disappeared.” (Yes, I am speaking from personal experience.)
Scheduling forces you to slow down and focus on quality, rather than rushing through a post at the last minute just because you need to get something out there.
When you take the time to consider your content carefully, it shows. Your posts will be more intentional, more aligned with your goals, and ultimately more effective at connecting with your audience. Plus, you’ve got a buffer (no pun intended) to refine things before hitting ‘publish.’
3. Be more efficient and save time
I’ve touched on this above, but time is your most valuable resource. And posting on Facebook can take a lot of it, especially if you’re creating your posts one by one on the day you plan to share them.
Then there’s the fact that constantly switching between tasks isn’t just inefficient; it’s a brain-drainer too. Did you know multitasking makes you slower, less accurate, and more mentally drained? I certainly don’t need that in my life, and I doubt you do either.
When you schedule your posts ahead of time, you can batch your work, reducing the mental load of having to post on the fly and breaking your flow. By setting aside an hour or two to plan your content for the week, you’ll save time, preserve your focus, and ensure that each post is on point. Efficiency for the win!
As I mentioned earlier, I created my content in batches before I went on maternity leave, which made the task more manageable. So much so, that it’s the most consistent I’ve ever been, despite being away from my desk.
4. Optimize reach by posting at the best time for your audience
Part of your content strategy involves figuring out the best time to post on Facebook for maximum engagement.
Julian was kind enough to dig into the data here on this, too. He pored over the performance of more than 1 million Facebook posts sent via Buffer by businesses, creators, and influencers to pinpoint the best time to post on Facebook, the best day to post on Facebook, plus the best-performing content on Facebook.
According to Buffer data, the best time to post on Facebook is 5 a.m. on Monday.
Note that this doesn’t necessarily mean this is when audiences are up and consuming your content — it’s likely that posts need some time to gain momentum on the feed.
Regardless, it means the best-performing posts were shared at that time. If that isn’t a great reason to schedule your Facebook content, I don’t know what else is!

Here’s a crucial caveat: There’s no universally optimal time to post, as it will also depend on your business and its circumstances. The best time to post on Facebook — or any social media platform — always depends on your audience.
In my group, for example, I’m reaching two primary time zones: SAST and CAT, so I need to find a time that works for both. I aim to hit the South African audience at lunchtime, and the US audience first thing in the morning as they start their day.
5. Better content planning and control
I know that random posting can feel a bit like throwing spaghetti at the wall to see what sticks. But when you schedule posts, you’re in the driver’s seat.
You can plan strategically, making sure your content is spaced out in a way that keeps things fresh and engaging. This also allows you to plan for time-sensitive content, ensuring it goes out when it’s most relevant.
It’s also much easier to maintain a consistent voice and style when you’re in control of your posting schedule. Instead of lashing out with something spicy and off-brand because you’ve had a bad day, planning and scheduling ahead gets you in the flow of creating thoughtful, on-brand content that reflects your values and resonates with your audience.
For me, scheduling Facebook posts provides peace of mind that everything’s taken care of, leaving me with more brain space to a) do my real job, and b) focus on creating even more awesome content.
Now that we've covered the ‘why’ of Facebook scheduling, let’s dive into the ‘how:’
How to schedule a post on Facebook using Buffer
Let's start with the most feature-rich scheduling route, a social media management tool like Buffer.
Here’s how to schedule using Buffer in four simple steps:
- Go to your Buffer dashboard.
- Select your Facebook Page or group.
- Craft your Facebook post.
- Schedule your post.
1. Go to your Buffer dashboard
Once you’ve signed up for Buffer and connected your Facebook account, you’ll see your Buffer dashboard: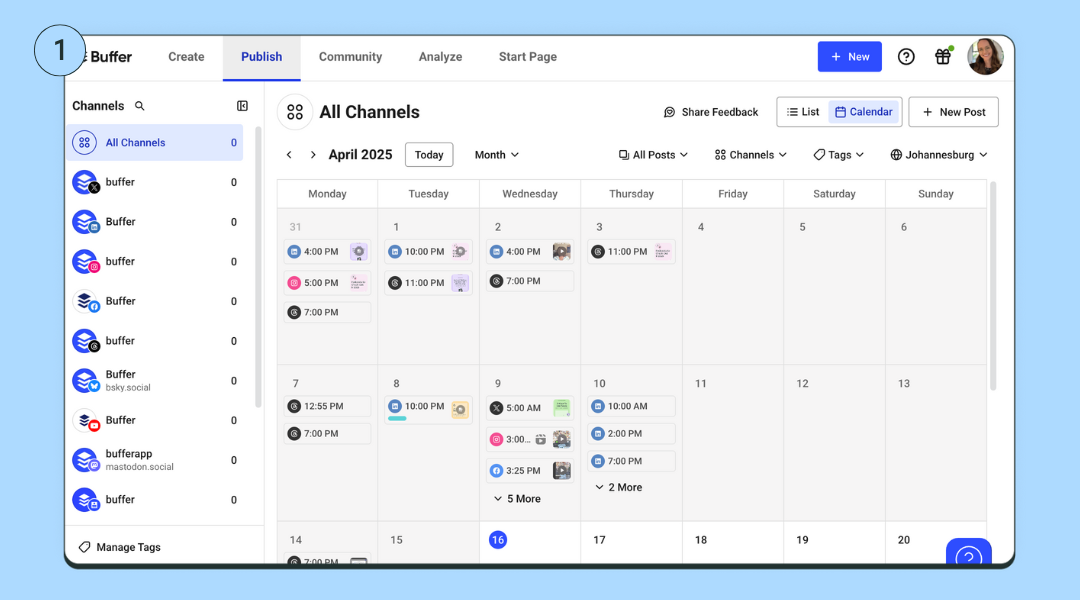
2. Select your Facebook Page or group
Select the Facebook Page or profile you want to post to, in the left-side column. Click on the '+ New' create post button on the top right-hand side of your screen, then choose 'Post.' 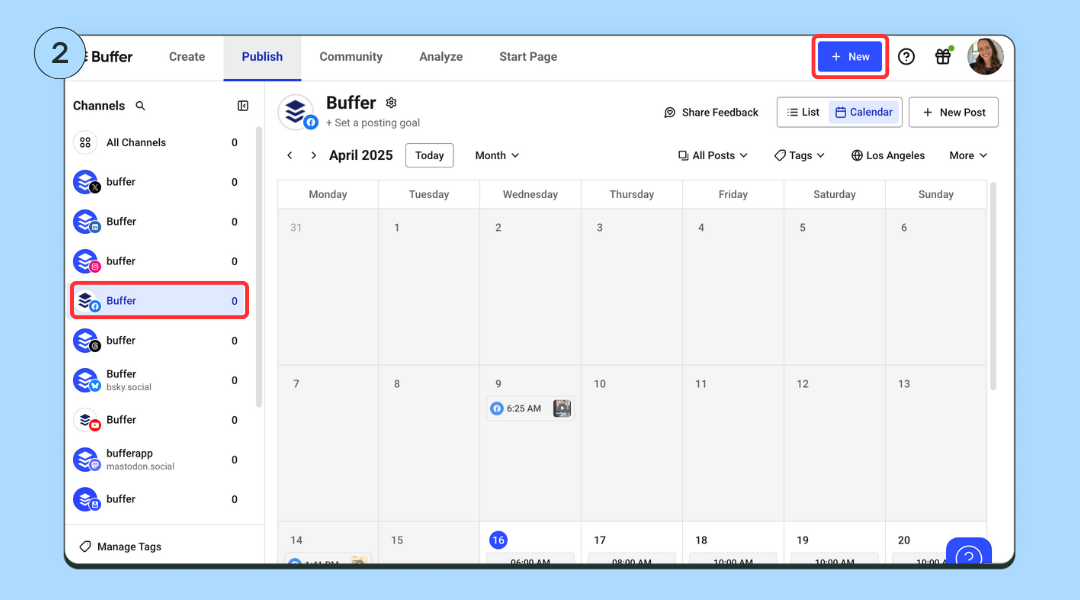
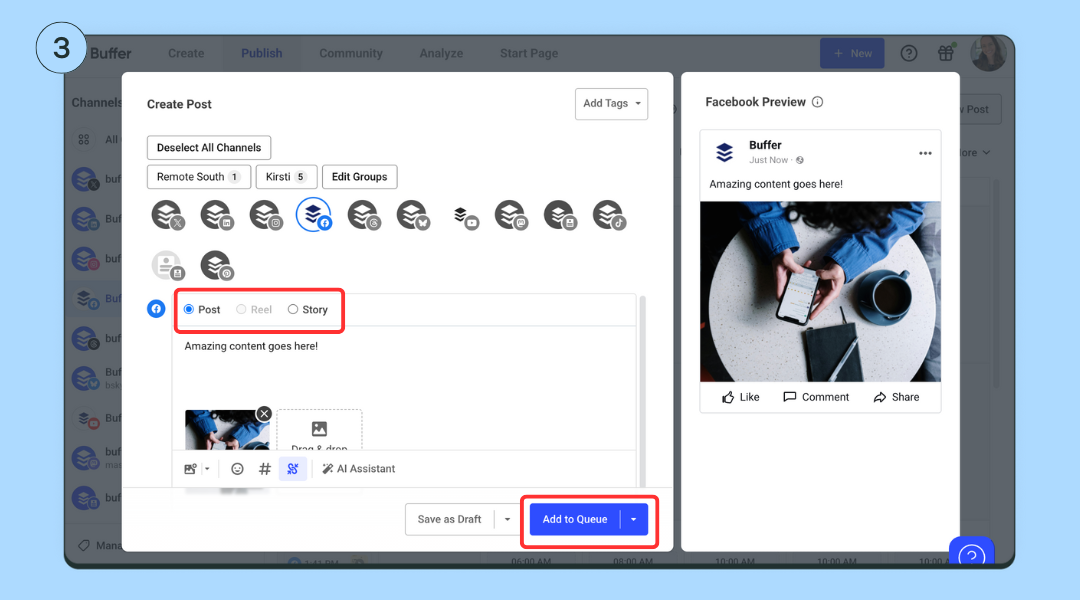
3. Create your Facebook post
A popup where you can craft your post will appear. (You can also add any other channels you have connected to crosspost your content elsewhere.)
Use an idea you’ve generated or create from scratch. Choose 'Post,' 'Reel, or 'Story,' depending on what content you want to post. Upload your media and add your caption.